Showing posts with label Pool Toy Draw. Show all posts

Thursday, August 4, 2022

Summer Workshop: Pool Toy Draw!

     I love the summer workshops.  It's such a fun way to dust off the cob webs and provide an opportunity for enthusiastic writers to devote some time to something they love to do.   These workshops go quickly in only one week, and we jump right into "Pool Toy Draw," which is always a class favorite.  

    Here's how you play:

Step 1: Draw a very colorful, creative pool toy.  This should be something never seen before, as creative as can be.

Step 2: Write a very clear desciption of your pool toy, including size, shape, colors, and any other detail that will paint the perfect picture in the reader's mind of exactly what you want them to see.

Step 3: Exchange descriptions, and try to draw your partner's pool toy as they draw yours, without any talking!

Our class voted this pair as the winners.  Congratulations to Julia (8th grade) and Allison (6th grade)!


My Pool Toy, by Julia 

    My pool toy is a small grassy platform with an armchair, umbrella, table and sprinkler. First for the grassy platform draw a medium length line going horizontally In the middle of the paper. on top of the line, draw a short rectangle.  It should be in the middle third of the line. On each side of the rectangle draw a small square (about the height of the rectangle) with a similarly sized circle on top. Make sure each side is identical because these are the arms of the chair. In between the two arms, draw an arched line, kind of like a rainbow. This should be be approximately double the hieght of the arms.

    Moving on the the oteher things on the platform, draw a line going at a slight diagonal to the right of the chair. It should be the same height of the chair. Then, for the umbrella shade,  draw a short semi circle.  It should be 3 times as long as the height. Now, draw 3 lines to divide it into 4 equal sections. Draw a small dot on top of the umbrella shade, right in the center, and the umbrella is done. To the left of the chair, there is a small table. Draw a line the height of the arm of the chair plus the base. On top of that, draw a skinny oval about the width of the circles in the arm of the chair. In the center of the table, add a small rectangle shaped like a glass of water, and add a short line sticking out for a straw.

    Now for the sprinkler, add a small black dot at the left edge of of the green line.  Add lines coming from the sprinkler arching over the chair, stopping at the umbrella shade.  This is water.  To the left of the umbrella, draw a short line going diagonally to the left, one going diagonally to the right, and one going straight.  On top of each, draw a small circle to be flowers.

    Now for color.  Color the line platofrm dark green, color the sprinkler dot black, and the water coming from it light blue and dark blue.  Color the flower stems green, with the left most flower yellow, the middle orange, and the right pink.  The umbrella stick is silver, the dot on top is silver, and different sections are alternating lavender and magenta (in that order).  For the table, the leg and top are silver, half of the glass is peach, and the straw is teal.  For the chair, make the bottom and arms turquoise, and teh back of the chair is an ombre in this order from the top to bottom: teal, light blue, dark blue.

    Now for the background.  Draw a small yellow circle in the top left corner.  Add black half moon sunglasses in the middle.  Now add a wavy teal line separating the two halves of the paper, under the float.    Color the bottom half a mix of light and dark blue, for water, and the top half light blue, for sky.


Look at these perfect matches!


Wednesday, June 23, 2021

Descriptive Writing: Pool Toy Draw

 In the fall, we play "Monster Draw."  In the winter, "Snowman Draw."  So for summer, we play "Pool Toy Draw!"  This descriptive writing game with a partner emphasizes the use of adjectives to create the perfect picture in our readers' minds, which is really what good writing is all about.

Here's How You Play:

Step 1: Draw a very creative pool toy.  It can be something that has never been seen before!

Step 2: Write a very thorough description, broken down into paragraphs, describing your pool toy to the very last detail. Because....

Step 3: Exchange descriptions with a partner, and try to draw theirs as they draw yours with no talking or last-minute corrections!  

Winners are voted on by the class, and receive a small pool toy and blog honors.  Enjoy these entertaining pieces!


Bobby's Pool Toy (rising 6th grader)

    My pool toy is a huge canon that shoots people into the water.

    First, make an imaginary line down the middle.  Second, draw two medium circles to the right of the imaginary line on the ground.  Those are the wheels.  Third, make a smaller circle inside the two circles.  Fourth, color the space in between the two circles black, and draw a line connecting the two wheels/circles.  Fifth, go to the left side of the left wheel and start to draw a straight line to the top left corner, but stop after about two inches.  Sixth, go to the top of the right wheel and draw a one inch line upwards.  Seventh, draw a three inch line parallel to the line going to the corner.  Eight, draw a skinny oval connecting the top line to the bottom line, completing the shape/cannon body.  (This was really hard to explain!). Ninth, draw a little head with a smiley face sticking out of the cannon.  Tenth, color the cannon body brown and leave the oval white.  Finally, draw a curly line coming out the top of the cannon, so that's the fuse.  The top of the curly line has a little flame coming out.

    On the left side of the imaginary line, draw a pool for the little man to land in.  Then draw a line with chunks taken out of it directing where the person is going to be shot.

    In the top left corner, draw a yellow sun.  In the other top corner, draw a cloud.

    Now it should look like a man is being shot out of a canon.  If it doesn't.... oh well.


Bobby described this so clearly!  James (rising 6th grader) produced this match!


Dylan's Pool Toy (Rising 6th grader)
     My pool toy is unique.  First, you need to draw an original doughnut-shaped float.  It should be big, around the size of your hand, taking up a bit less than 1/3 of the page.  Color it forest green, and color the center hole with your pencil.

     Now, draw a medium-sized yellow circle at the front, or top part of the doughnut.  This is a head.  Inside of the yellow head, draw a smiley face, with black small eyes and a mouth.  Do not draw a nose.  Think of a clock.  The doughnut is the center, and the head we just drew is at the 12 o' clock.  Now, draw an identical head at the 3 o'clock spot.  The only difference is now it is gray and has a neutral, or bored face.  It should be colored gray, and its mouth should be a horizontal line.  Next, draw a blue sad face the same way at 6 o'clock.  And finally, draw a red angry face at 9 o' clock.  Its eyebrows should be a "v" shape, and its mouth a gray/black circle.

     For the final touch, add four long light green squiggly pool noodles in between the heads.  Now you are done drawing my pool toy.

Dylan wrote so carefully, especially about the colors and faces!  Tyler (rising 7th grader) was able to draw this twin toy!


AnaRose's Pool Toy (Rising 7th grader)


    My pool toy is an animal donut.  Its head is a wide oval shape.  It has two bear-like ears on the top, about an inch distance apart.  For both ears, you will draw an inner part like an upside down U.  Make sure that there is still space between the inner ear and the edge of the ear.  For the left ear, the inner section is black, and the rest is white.  For the left ear, the inner section is black, and the rest is white.  For the right, the inner is white while the rest is black.  For the face itself, you will draw two lines (making three spaces) horizontally across the face.  They should be evenly set apart.  For the top space, make it black, and leave the middle white.  For the last space, put a line in the middle and make the left black, and leave the right half white.  For the middle section, create circle glasses roughly in the center of that section.  Each ring should be about half an inch apart.  Just make a black line connecting the two rings and a line on the other side towards the end of the face slightly upward.  For the ring, create an upside-down U inside.  It's a gentle U, so don't make it a strict upside-down U.  For the left ring, shade it red and the other green.  Color over the upside-down U.  Those serve as eyes.  Now just outline everything in black.
    
    For the body, you have a short neck that curves into the belly.  Once you make the belly (not too big or two long), create the donut shape connected to the belly!  You can see the long hole of it, but you cannot see into it directly.  We are facing it sideways.  In the middle of the hole (on the edge of course), create bee-like wings, short and plump.  There are two for each set.  However, the further one on the back you can only see the left one completely.  For the right, you can only see a bit that peeks over the front left wing.  At the end of it, there is a fox/raccoon-like tail.  It's puffy and a bout an inch long; maybe a little longer.  It is going a bit downwards, but not completely vertical.

    Now, draw two horizontal lines through the tail, making three spaces.  The middle space is black and the others are white.  Back to the body: make seven lines, making either space, and try and make them evenly apart.  But the space near the end will be the smallest.  The color pattern will be white-black-white-black, and make sure that the last space (back of the body) is black.  Also, make sure that the lines don't go through the hole!  This part is before you color the body.  (I forgot to write this part beforehand!). Right underneath the chin is a red bandana.  It goes down almost to the middle, but not quite on each side (bottom of chin).  The little fabric ties are shown.  They are red.  For the bee wings, they are a plain gray.  Once you finish this, outline the whole body with black.

    Now for the background, we are in an inside pool area.  The curb of the pool is very thin, and it goes across the whole page horizontally and is about underneath the chin of the pool toy.  It's a butter yellow color.  The pool has five indigo blue small waves.  Top right, middle, top left, bottom left, and bottom right have these.  The rest of the pool is a light blue.  The wall has two windows.  The left one starts at the left ear (between the spaces of the top edge of the paper, and the ear, same as the right window, expect it's the tail) and ends right before the right ear.  It's about an inch an a half tall.  The inside has a line going horizontally and vertically; they meet in the middle of the window.  The right window starts where the tail meets the body, and ends where the tail ends.  Outline the windows in black, and leave the wall completely white.  And THAT is my pool toy!

Wow!  That is a thorough description!  The class voted that Nicolyn (rising 7th grader) and AnaRose were victorious, because the only difference they could find was the huge head.  :)


Sunday, July 12, 2020

Pool Toy Draw!

     ADJECTIVES, ADJECTIVES, ADJECTIVES!  They paint the picture in the reader's mind of exactly what we want them to see.  This is the theme of our summer workshop game, "Pool Toy Draw."

Step 1: Draw a creative pool toy, preferably with a background and some level of complexity.  It should be unique and unlike any other pool toy ever seen!
Step 2: Write a description of the pool toy, broken into paragraphs.  Include size, shape, color, and number adjectives in every sentence!
Step 3: Trade descriptions with a partner.  They will draw yours, and you will draw theirs, without any talking or help!  If adjectives were effectively used, the pictures should end up being a very close match!

     What I love about this game is the instant feedback it gives my students about the importance of descriptive language.  I can often hear them playfully grumbling during Step 3, wishing their partners had included some crucial piece of information that would help complete the picture in their mind!  On- demand writing, writing under pressure, and reading comprehension are all skills that are developed with this simple, fun game.

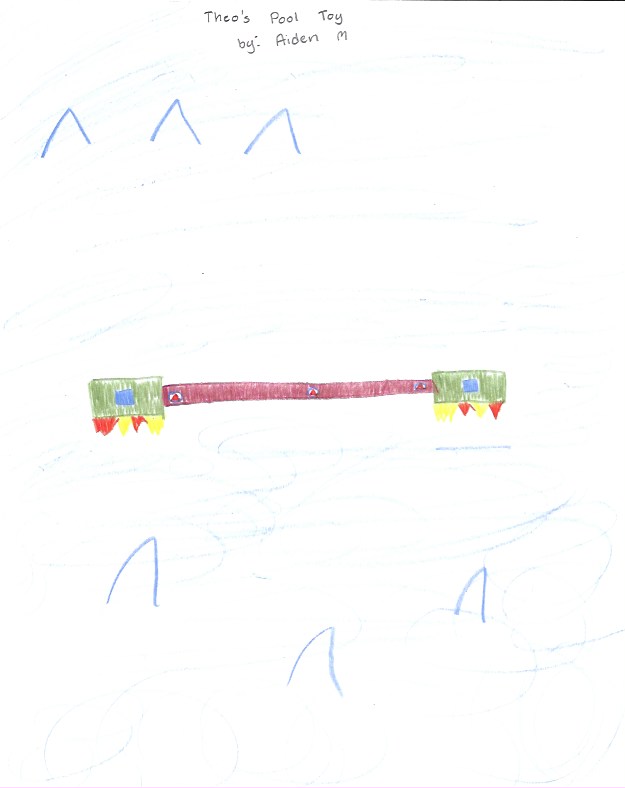
     In this first sample, Theo (5th grade) and Aiden (7th grade) got paired up.  Now, you must know, Theo has been victorious at both "Snowman Draw" and "Monster Draw" in his school workshops.  He is a VERY careful and descriptive writer, so Aiden was very happy to be partnered up with him!  Aiden is a great, thorough reader.  So they made a great pair!

                                                        Theo's Pool Toy

     My paper is vertical.  The pool toy is horizontal.  My pool toy is symmetrical. 

     My pool toy has a large noodle that is skinny and red.  At each end of the noodle are medium green rectangles horizontally placed.  There is a blue small square inside each of them.  There are yellow and orange flames coming out of the bottom ends of the green rectangles.

     On the noodle, there are three blue circles symmetrically placed that fit perfectly on the tube.  They each have one orange triangle inside of them.  The circles are not large enough to pass the sides of the tube.

     The background includes a gray plain border.  There is water all around the pool toy, and six waves randomly scattered.  Three are on the top, and three are on the bottom.  The waves are blue.


Looks like a fun thing to play with on a hot summer day!  Way to go Aiden for reading and drawing so carefully, and congratulations to Theo for yet another victory as a writer!


Julia's Pool Toy

     My pool toy is a giant pineapple wearing sunglasses-shaped pool float.  When drawing this, make sure to picture a pineapple in your mind, as well as read my instructions.

     For the general shape, draw a large oval in the middle of the page.  Coming from the top of the large oval, add three smaller and skinnier ovals, and make sure that they look kind of like the top of a pineapple.  Then, right next to the left-most oval on top, draw a little circle, with five little ovals coming from all around it.  This should look like a flower in the pineapple's hair.

     Next, we will be doing decorations.  About one third of the way down from the top of the large oval, draw half moon shaped sunglasses.  Make sure they fit the pineapple well.  About two-thirds of the way down from the top of the large oval, draw a medium-small half moon shaped mouth.

     Now, we will add color.  Color the sunglasses all black.  Color the mouth pink.  Color the large oval yellow.  Color the top three ovals light green.  Lastly, color the middle of the flower orange, and the petals of it pink.

     For the background, just draw a rainbow behind the middle of it.  The colors of the rainbow should be in this order: Red, orange, yellow, light green, light blue, and dark purple.  Leave the rest of the page blank, and you're done!

Julia (6th grade) nailed it!  So very descriptive, and so clear and easy to read.  Marissa (6th grade) was a careful reader and drew an absolute twin!


Sophia's Pool Toy

     My pool toy is shaped like a tree.  First, add two large, rounded triangles in the middle of the page, on top of each other.  Make the "point" of the bottom one overlap into the bottom of the second triangle.  About a third of the top of the triangle should overlap.  At the bottom of the lower triangle, add a medium sized, rounded rectangle, slightly taller than a square.  The width of the rectangle should be about one third of the width of the bottom of the triangle.  Erase the top of the second triangle that overlaps with the top triangle (Don't erase any of the top triangle.). Now it should look like an oversimplified pine tree.  

     Inside the top triangle, close to the top, write a large capital "I."  Underneath that, write the word "like" in cursive.  (Still large-is, and make it lower case.). Instead of the dot for the "I", put a small heart instead. In the bottom triangle, write "trees" in all upper case, similar size and style to the "I" at the very top.  Make sure the word "trees" is in the lower part of the bottom triangle, similar placement to the "like" in the top triangle above "trees." Above "trees," add another curved line to match the base of the top triangle.  This will make a sort of thick stripe directly under the first triangle and a bit above "trees."  Also, put a medium-sized heart in the middle of the trunk.

     Put thirteen pointy individual wave decals randomly spaced around the paper.  In the top left corner, draw the same sized heart as the one on the trunk, but the top of the heart is facing the corner it's closest to, making it a diagonal.

     Outline the two hearts in dark pink, trace the words with black, trace the waves with dark blue, trace the two triangles in dark green, and the stump with dark brown.  Color the hearts pink, the stump brown, the strip in between the two triangles dark green, and color the rest of the leafy part of the tree a lighter green.  Shade a bit in each wave with light blue.

Wow!  Sophia (7th grade) is so extremely detailed even with a somewhat simple drawing.  She was so detailed, and Lia (7th grade) was such a careful reader, that they were voted victorious by their group!